Table of Contents
- Introduction
- Website Setup
- 2.1 Domain Registration
- 2.2 Initial Hugo Setup
- 2.3 Themes
- 2.4 Hosting
- 2.5 DNS
- 2.6 CDN
- Blog Workflow
- Summary
- 4.1 Cost
- 4.2 Advantages
- 4.3 Disadvantages
- 4.4 Source Code
Introduction
In this post I’ll describe both the initial setup as well as the general workflow that I use when adding content to this website. For context, from 2018 - 2019, I configured my GitHub User Site via GitHub Pages to host my personal website for free, using a domain purchased from NameCheap. The layout of the website itself was pulled directly from a Bootstrap theme that used the ruby-based static site generator Jekyll. One year ago, I decided to change the tech stack to something more recent and interesting to work with. I landed on Hugo.io, and opted for a cloud deployment because I already had multiple projects running in my personal AWS account, and became familiar with most of AWS’ flagship services at work. If you’re interested in Hugo, hopefully this gives you an idea of what it looks like from start to finish.
Website Setup
Domain Registration
Purchasing a domain for your website is the first step in the setup process. There are a large number of domain registrars that sell domain names. Take the time to search for a reputable up-to-date source for the best registrars. Personally, I believe the most popular registrars are Google Domains, Amazon Route 53, and NameCheap.
Initial Hugo Setup
Hugo has excellent documentation as well as a brief quick start guide.
Installation:
# MacOS
brew install hugo
# Arch Linux
sudo pacman -S hugo
# Ubuntu Linux
sudo apt install hugo

# Verify installation was successful
hugo version
Project Configuration:
# Create and configure site directory (choose your name for the site)
hugo new site <WEBSITE_DIRECTORY>
# Configure git repository
cd <WEBSITE_DIRECTORY>
git init
You can add posts to the website directly by using the hugo new command, but if you find a theme you like, it’s typically easier to copy and overwrite all files from the theme example into the root of the website folder:
cd <WEBSITE_DIRECTORY>
cp -r themes/<THEME_DIRECTORY>/exampleSite/* .
Themes
Check out the officially curated Hugo themes here. When choosing a theme, I would exercise caution if you plan on making significant changes to the layout of the theme example page. If you are planning on making major alterations to a page, make sure you look at the source repository and understand how the maintainer is handling the site format. In particular, I would recommend paying close attention to defined partials and shortcodes.
One other common issue I ran into once I started modifying themes was handling version control for changing underlying theme features. To avoid git headaches later down on the road, ensure you properly clone the submodule into your working project directory. As an example, here’s how I initially added this theme:
-
Fork Theme Repository: in your browser, hit the fork button on the theme repository landing page.
-
Add Git Submodule to Website Repository
# Add your fork locally as a submodule of your website cd <WEBSITE_DIRECTORY> cd themes git submodule add https://github.com/<GH_USERNAME>/<THEME_REPO_NAME> -
Stage Changes & Git Push
# Pull up-to-date theme submodule code and add to website repo
cd <THEME_DIRECTORY>
git pull
git add -A
git commit -m "<COMMIT_MESSAGE>"
git push
# Add git modules information to website repo
cd ../../
git add .gitmodules
git add themes/<THEME_DIRECTORY>
# Confirm your branch looks correct
git status
# Commit and push changes to website repo
git commit -m "<COMMIT_MESSAGE>"
git push
Once you find and add a theme, you can begin adding posts and experimenting with the design of your website. When you want to move on to deployment, you’ll need to actually build your website. This is done with the hugo command, but I highly recommend you explore the usage in the CLI and read the documentation. Some example flags:
# Include content tagged as drafts in the public directory
hugo -D
# Include content with a publish date in the future in the public directory
hugo -F
Hosting - Cloud Storage
For this setup, the easiest way to store your website is in a S3 Bucket. AWS has a verbose tutorial on the details of this work here.
Command Line Steps
-
Create two S3 buckets (API Docs)
# Bucket for actual website contents aws s3 mb s3://<DOMAIN_NAME> --region <REGION> # Bucket for subdomain redirect aws s3 mb s3://www.<DOMAIN_NAME> --region <REGION> -
Upload public directory contents to bucket (API Docs)
cd <WEBSITE_DIRECTORY>
cp public s3://<DOMAIN_NAME> --recursive
Console Steps
-
Edit domain bucket properties
- Select your domain bucket in the S3 console
- Select the Properties tab
- Scroll down to Static Website Hosting, and select Edit
- Enable Static Website Hosting, select Use this bucket to host a website, and specify the Index Document as ‘index.html’
- Select Save
- Make note of the Bucket Website Endpoint value under the Static Website Hosting section
- Format: http://<DOMAIN_NAME>.s3-website-<REGION>.amazonaws.com
-
Edit subdomain bucket properties
- Select your subdomain bucket in the S3 console
- Select the Properties tab
- Scroll down to Static Website Hosting, and select Edit
- Enable Static Website Hosting, select Redirect requests for an object, select ‘http’ as Protocol, and specify the Target Bucket as your domain name
- Select Save
-
Enable domain public access
- Select your domain bucket in the S3 console
- Select the Permissions tab
- Select Edit on Block public access (bucket settings)
- Deselect Block all public access, so that none of the boxes are checked
- Select Save
- In the Permissions tab, select Edit on the Bucket Policy
- Enter the below JSON policy and select Save
Bucket Policy:
    {
        "Version": "2012-10-17",
        "Statement": [
            {
                "Sid": "PublicReadGetObject",
                "Effect": "Allow",
                "Principal": "*",
                "Action": "s3:GetObject",
                "Resource": "arn:aws:s3:::<DOMAIN_NAME>/*"
            }
        ]
    }
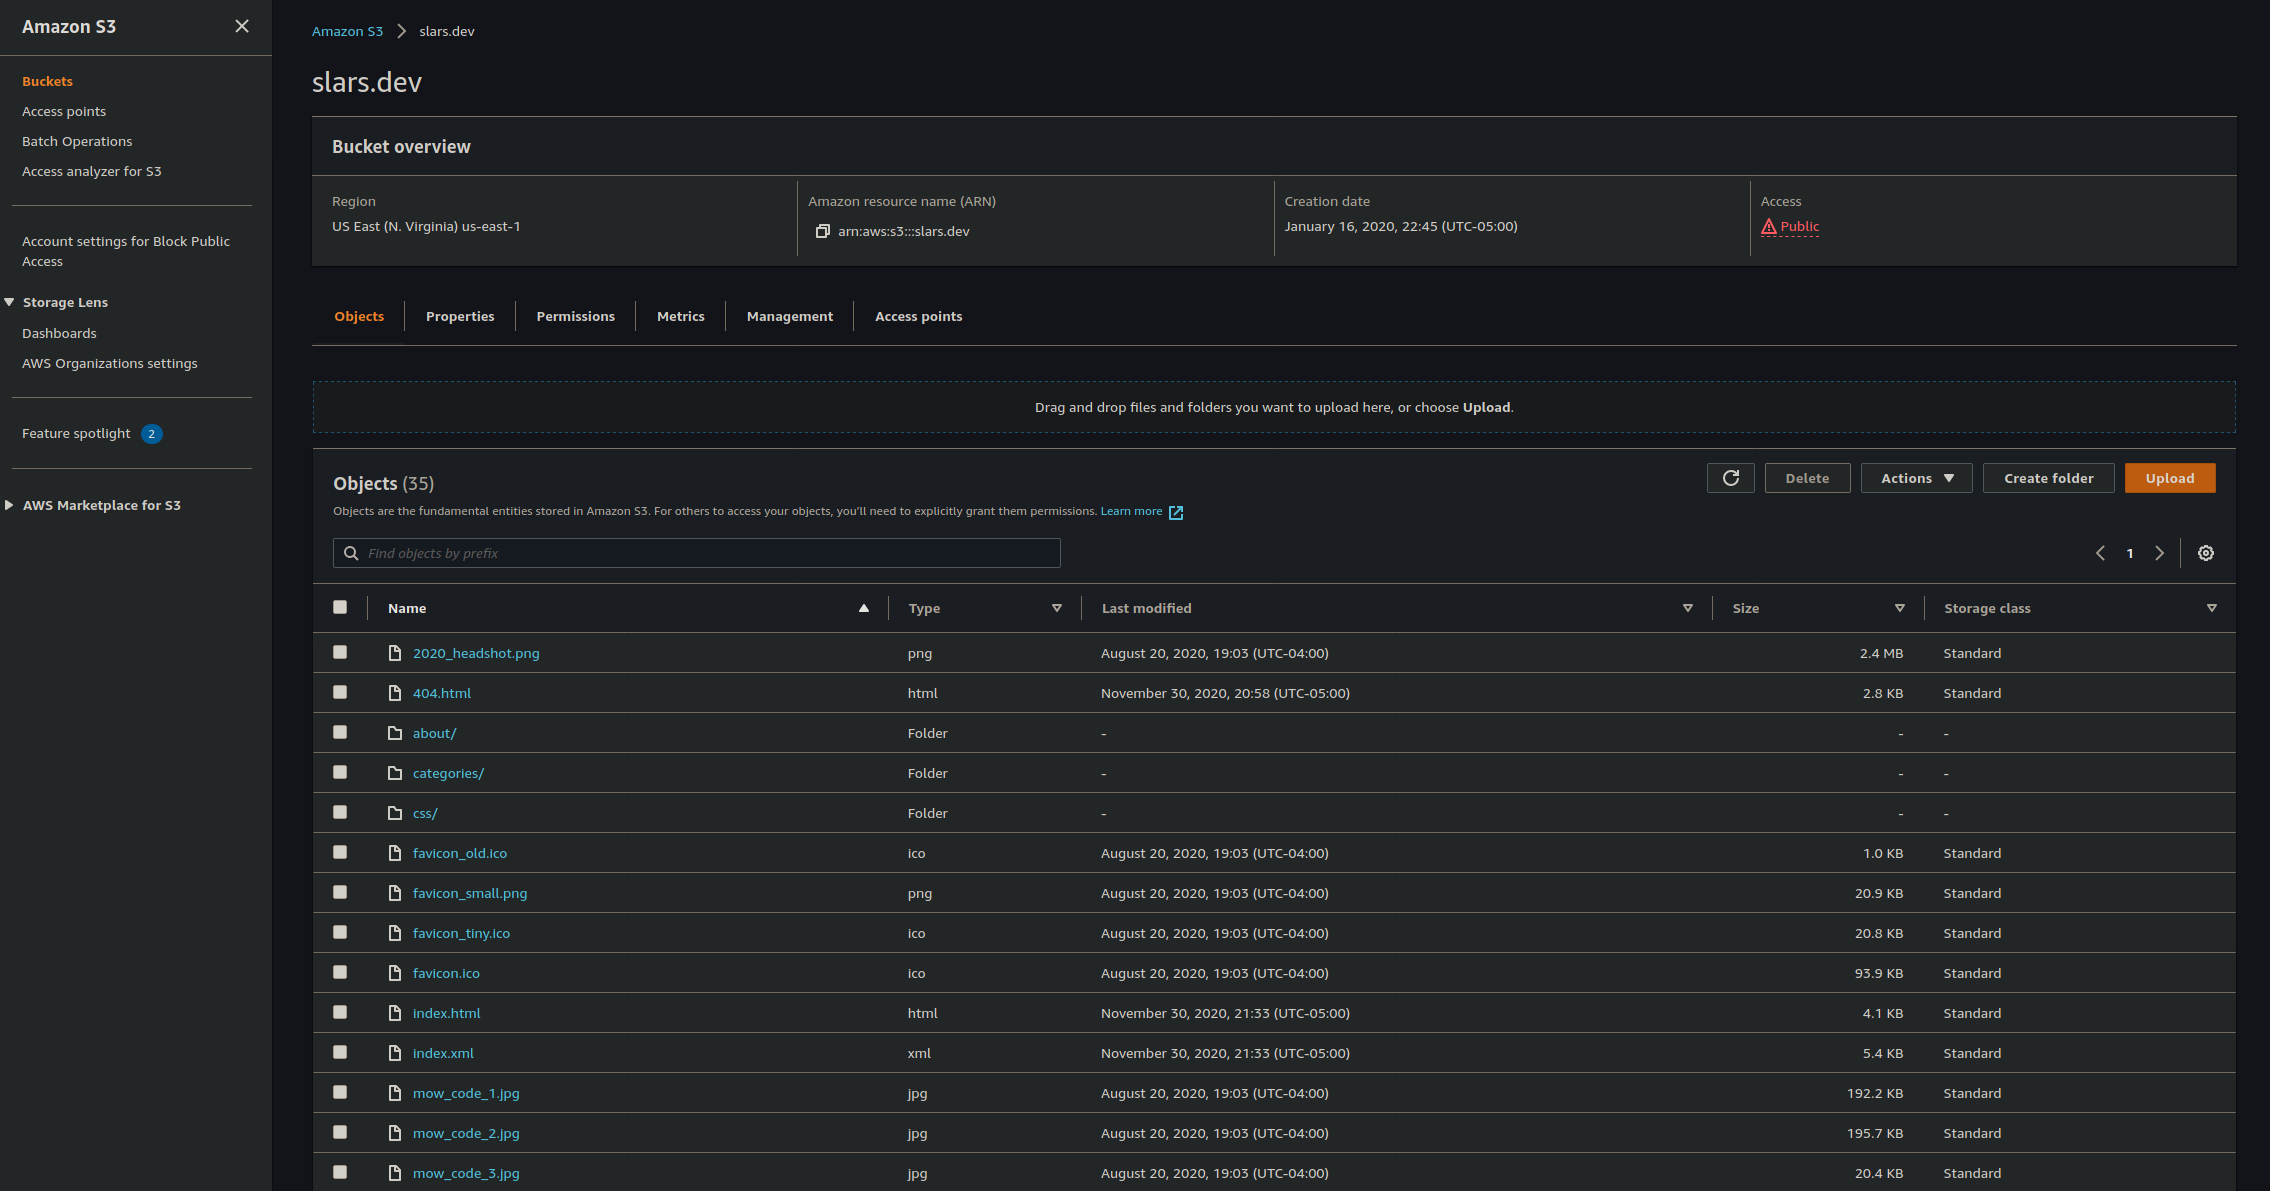
The below image shows the organization at the root of the S3 bucket. As you can see, when compiled into the public directory, Hugo flattens the directory structure:
DNS
Route 53 Hosted Zone is the obvious choice for a Domain Name System (DNS) provider when all other infrastructure components are also in AWS (if you’re unfamiliar with the concept, CloudFlare has a great explanation).
- Create a Route53 Hosted Zone
- In the console, navigate to the Route53 Service page and select Hosted Zones
- Select the Create a Hosted Zone button
- Enter your domain name in the Domain name field, and select the Public hosted zone button for the Type option
- Select Create hosted zone
- Add Record Sets to Hosted Zone
- By default, an NS and SOA record will be added upon Hosted Zone creation
- Select the Hosted Zone, and select the Create record button
- On the next page, set Type to ‘A’, set Alias to ‘Yes’, and set Alias Target to the S3 bucket Endpoint URL (not the name of the bucket), and create the record
- Create another A-type record in the same way, but specify the Name of the record with ‘www’, so that its full name is www.<DOMAIN_NAME>
- Optionally create a AAAA-type record for IPv6 routing using the same alias value as above
- Add DNS Entries to Domain Registrar
- Navigate to your account page for the domain registrar you used to purchase the domain
- Using the four Route53 name servers (the ‘value’ field from the NS record in your Hosted Zone), configure custom DNS for your domain, using the documentation of your registrar
CDN
For this component of the website deployment, I used a CloudFront Distribution. A Content Delivery Network (CDN) is a geographically distributed network of proxy servers and data centers. There are two main advantages of using CloudFront:
- AWS is a Certificate Authority (CA). This means they are an organization recognized to provide Secure Sockets Layer (SSL) certificates, which authenticates the identity of a website to any entity connecting to it. This allows connections to the website to utilize the HTTPS protocol (for more information, please refer to the EFF documentation). Using AWS as your CA when requesting an SSL certificate allows seamless integration to add it to a CloudFront distribution.
- A CDN service such as CloudFront allows secure and low latency delivery of web content to end users. In most cases it will noticeably decrease load time of pages.
The following steps will grant your website an SSL certificate and serve content from your S3 bucket:
- Request SSL Certificate
- In the console, navigate to the Certificate Manager (ACM) Service page
- Select Request a Certificate
- Select Request a public certificate option and select the Request a certificate button
- In the next page, Add domain names, add the apex domain name of your website, and optionally any FQDN or subdomains (e.g., www.<DOMAIN_NAME>, *.<DOMAIN_NAME>)
- In the next page, Select validation method, select DNS Validation (as we are using Route53 for DNS, this will take less time)
- Optionally add tags, and click through to the Review page until you can select the Confirm and request button to complete the request
- Add Certificate to Route53
- In the next page, Validation, the dropdown Domain will display the given CNAME record
- Select Create record in Route53
- Check back and proceed when the status of the certificate is Issued
- Create Distribution
- In the console, navigate to the CloudFront Service page
- Select Create Distribution, then select Get Started
- On the next page, for the Origin Domain Name option, enter the Endpoint URL of the public S3 bucket
- For the Viewer Protocol Policy option, select Redirect HTTP to HTTPS
- For the Alternate Domain Names option, enter your apex domain name, as well as any FQDN or subdomains if they were configured earlier (e.g., www.<DOMAIN_NAME>, *.<DOMAIN_NAME>)
- For the SSL Certificate option, select Custom SSL Certificate and select Import Certificate with ACM, selecting the certificate that was issued in Step 2
- Select Create Distribution
- Check back and proceed when the status of the distribution is Deployed
- Link Distribution to Hosted Zone
- In the console, navigate to the Route53 Service page
- Select the Hosted Zone that you created for the domain
- Every record with a Name of your domain name needs to be changed to route traffic to the CloudFront distribution, using the distribution URL (when you select Alias to CloudFront distribution, it will provide a dropdown of options)
- (Optional) Invalidate Cache
- If you’re impatient and don’t want to wait the 0-48 hours for pages to expire and changes to propogate to the CloudFront edge, you can invalidate the cache at the root of your S3 bucket to expedite the process.
- Once you’ve uploaded everything to S3, navigate to the CloudFront Service page
- Select the distribution you created for your website
- Select the Invalidations tab, and select the Create Invalidation button
- Specify the Object Paths that you want to invalidate (to refresh all files, you can invalidate at the root /*)
- Wait several minutes until the Status of the Invalidation is Completed
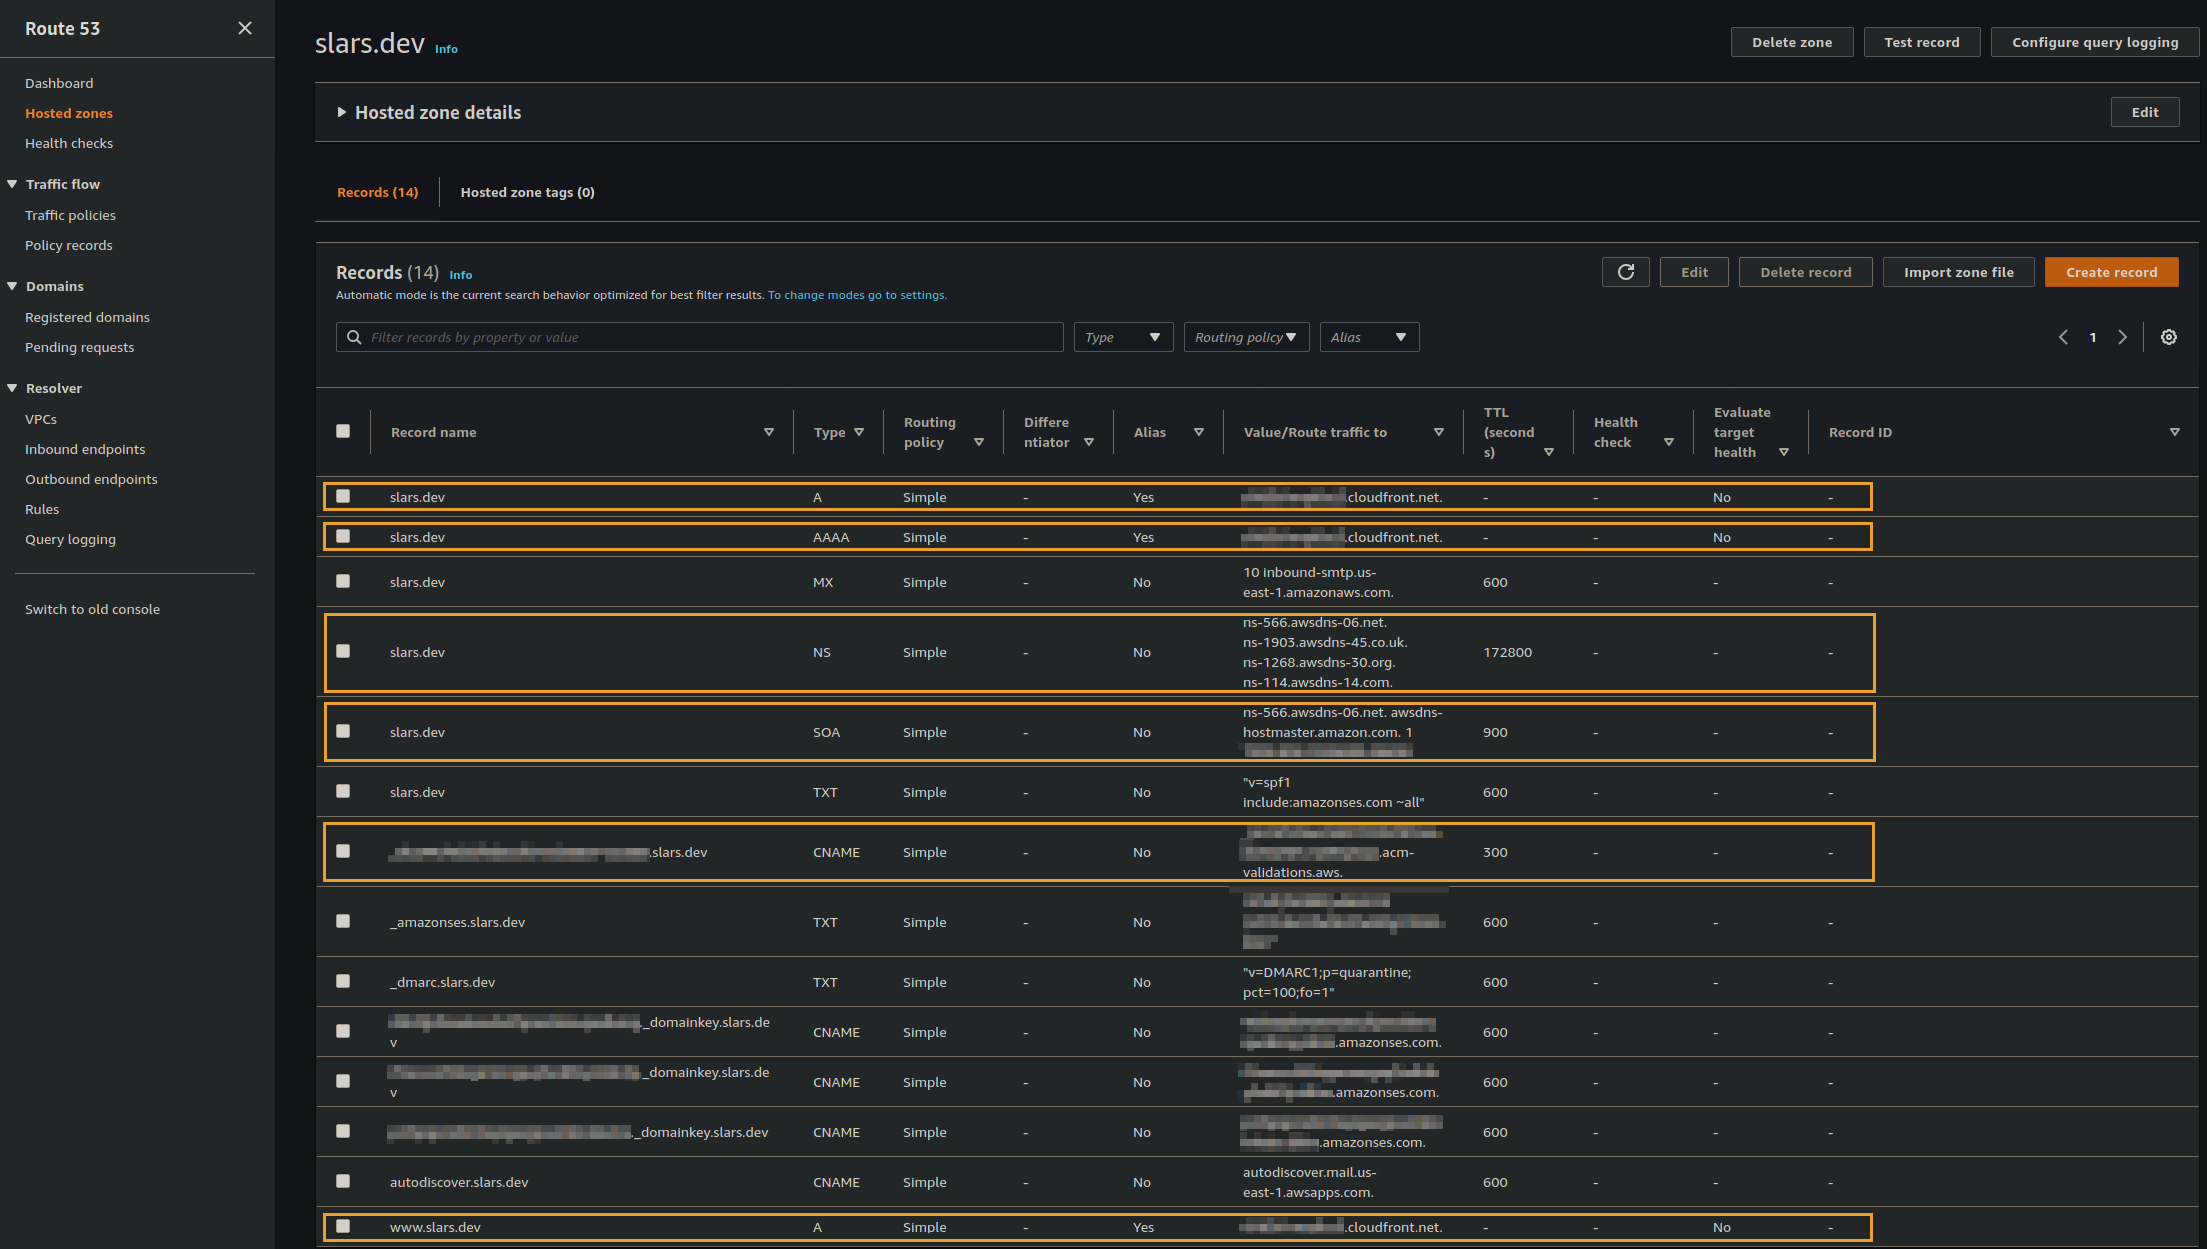
The below image shows the Route53 details for this website. You should see the same highlighted records in your own Hosted Zone at this point. Note that there are some additional records for email, as I also configured AWS WorkMail under the same custom domain:
Blog Workflow
Writing Local Drafts
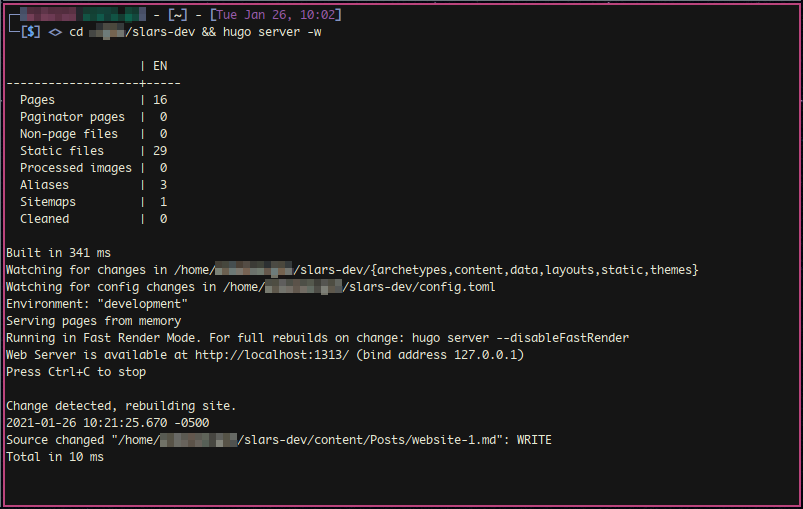
Post organization depends entirely on your theme. In most cases, it’s as simple as adding a markdown file to the posts directory under content. To see changes you make in realtime, start the web server:
hugo server -wThis will detect any changes within the website directory, and will rebuild the website automatically at http://localhost:1313.
Version Control
I have a private GitHub repository for the full website, and a public repository for the public sub-directory. S3 buckets also support object versioning, which I have enabled in the bucket that hosts the public folder for CloudFront.
GitHub Lambda Deployment
If you’d like to take this a step further, you can automate the deployment of your website as well. I created a simple Lambda function that looks at my GitHub repository once a week. If any changes were pushed, it syncs the public S3 bucket with the updated public website directory. If you want to do something similar, I’d recommend enabling object versioning in your bucket because it will save you some trouble if you ever have to debug the automation workflow. This functionality can also easily be accomplished by a local cronjob, as you can push changes to your bucket and invalidate the cache via the AWS CLI.
Summary
Cost
Aside from the time it took to figure out how I wanted to host the site, the annual cost for the domain is $12.88, and it costs me $0.50 per month for the Hosted Zone in Route53 ($0.50 per Hosted Zone for the first 25 Hosted Zones in an AWS account), which totals to less than $20 annually.
Advantages
The deployment in AWS guarantees that in the event of a sharp spike in traffic (like if one of your posts received attention on a web forum), the infrastructure would support it seamlessly. This is not particularly challenging for static sites, but still, they call it the hug of death for a reason.
Hugo is ludicrously lightweight and fast compared to other frameworks. It abstracts out components of front end development that you don’t need, uses a very simple in-memory web server for development, and has an actively maintained ecosystem of themes.
Disadvantages
This tech stack adds slightly more complexity overhead compared to extreme bare-bones implementations like static HTML/CSS pages hosted for free on GitHub Pages, or out-of-the-box solutions like Squarespace and WordPress.
Like any other technology stack, building your website with components (e.g., theme, shortcodes) that rely on underlying outdated frameworks introduce technical debt to the system. This is another reason I recommend choosing the simplest possible theme that provides your approximate site structure.
Source Code
While I maintain a private GitHub repository for this website so that I can actively work on draft posts before publication, I have a copy of the public directory in this repository.