Introduction
Kubernetes has become a popular but divisive technology over the last few years. A quick search on HackerNews will show discussions on everything between use of the tool constituting a cult and how it can be used to reduce AWS EC2 costs by up to 80%. Regardless of anyone’s personal opinion, the container orchestration system has an increasingly prevalent role in containerization and production deployments.
About a year ago I first began tinkering with the idea of writing Python code with the client library to learn more about what happens when pods, jobs, and networking fail in different ways. I needed to get up-to-speed on the mechanics of bare-metal cluster implementations for work, and this was an excellent way to learn how to create containers whose services would be resistant to pod failure. My previous blog post describes my research notes on other similar endeavors, and my justification for writing a tool from scratch. In the interest of maintaining consistency with the nautical theme of Kubernetes, I thought a venomous jellyfish was an appropriate name.
Aside from the satisfaction of grokking a new library, the motivation behind man-o-war was to access low-level functionality to inject stress to a cluster in a myriad of categories. To achieve this, the general avenue of attack is to select certain existing containers, install the stress-ng package if possible, and execute specific or random arguments for the command. It should be noted that later on I found a very similar and much more actively maintained open-source project, Pumba, from the maintainer of the stress-ng docker image that I use for this project. Pumba also uses stress-ng under the hood and if you are looking for a tool that works out of the box I would recommend trying it out.
You can find all of the source code on GitHub here.
Technical Design
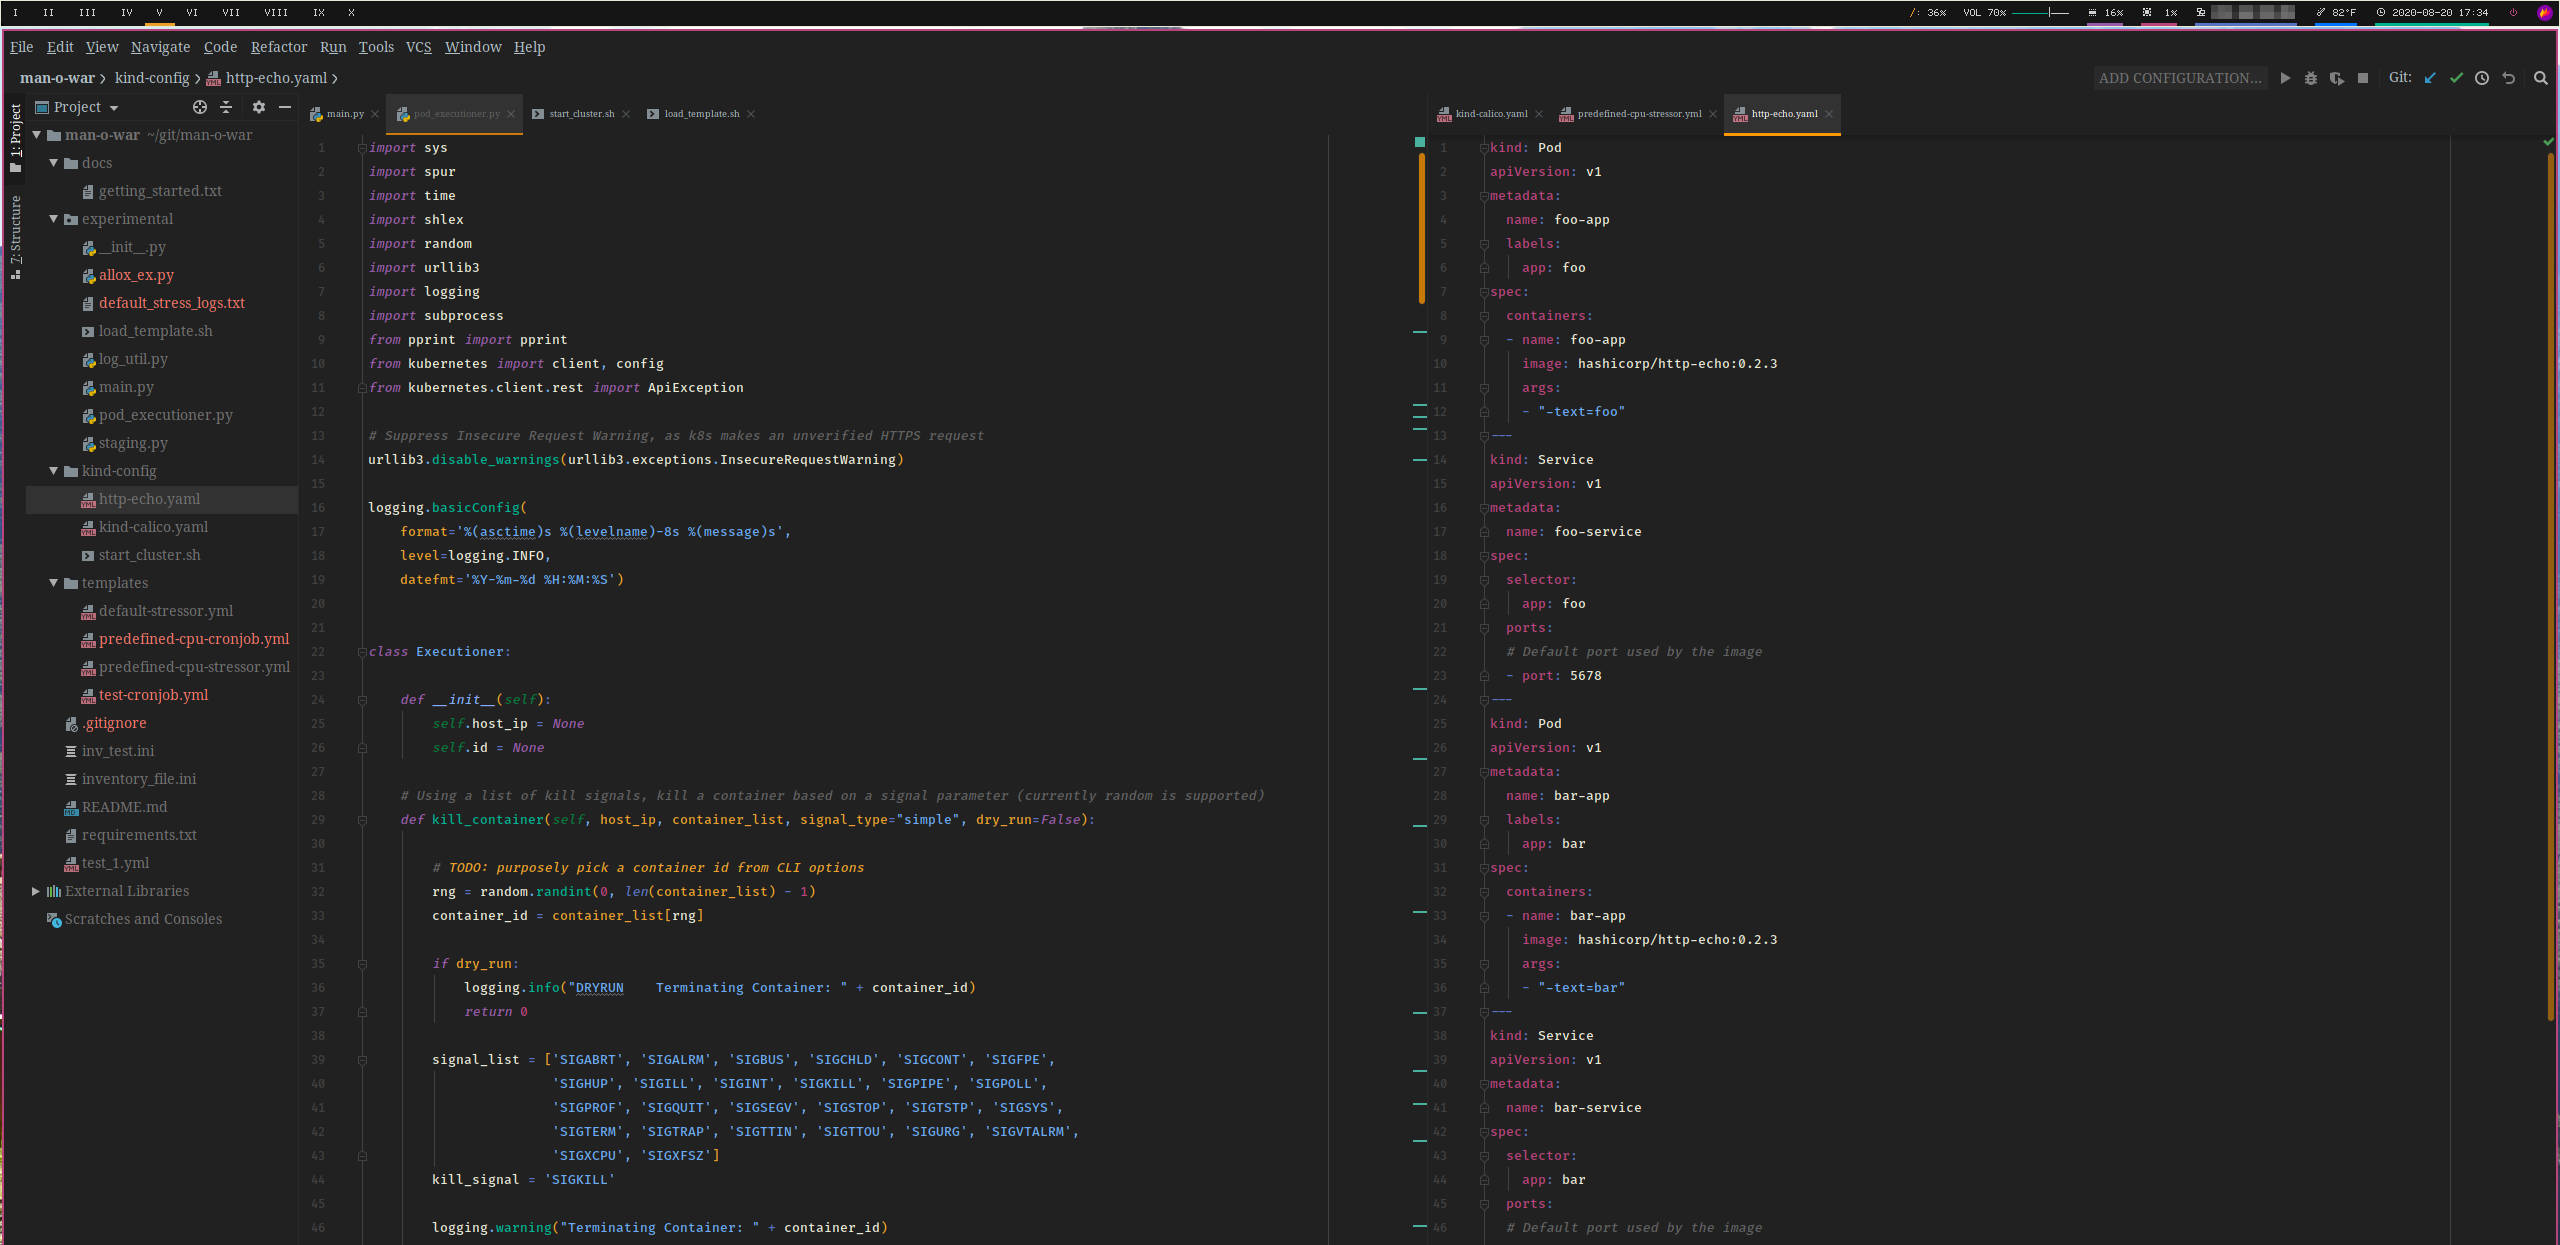
Back in August of 2019 I had two primary goals in terms of functionality. First, I wanted to be able to use the Kubernetes client library to recognize a configured cluster, store information about it, install stress-ng in certain pods, and execute commands. Second, I wanted to be able to dynamically format YAML to create a new job using a Docker image with stress-ng pre-installed to execute similar commands in their own namespace. See below for some of my initial sketches of the logical flow of the program.
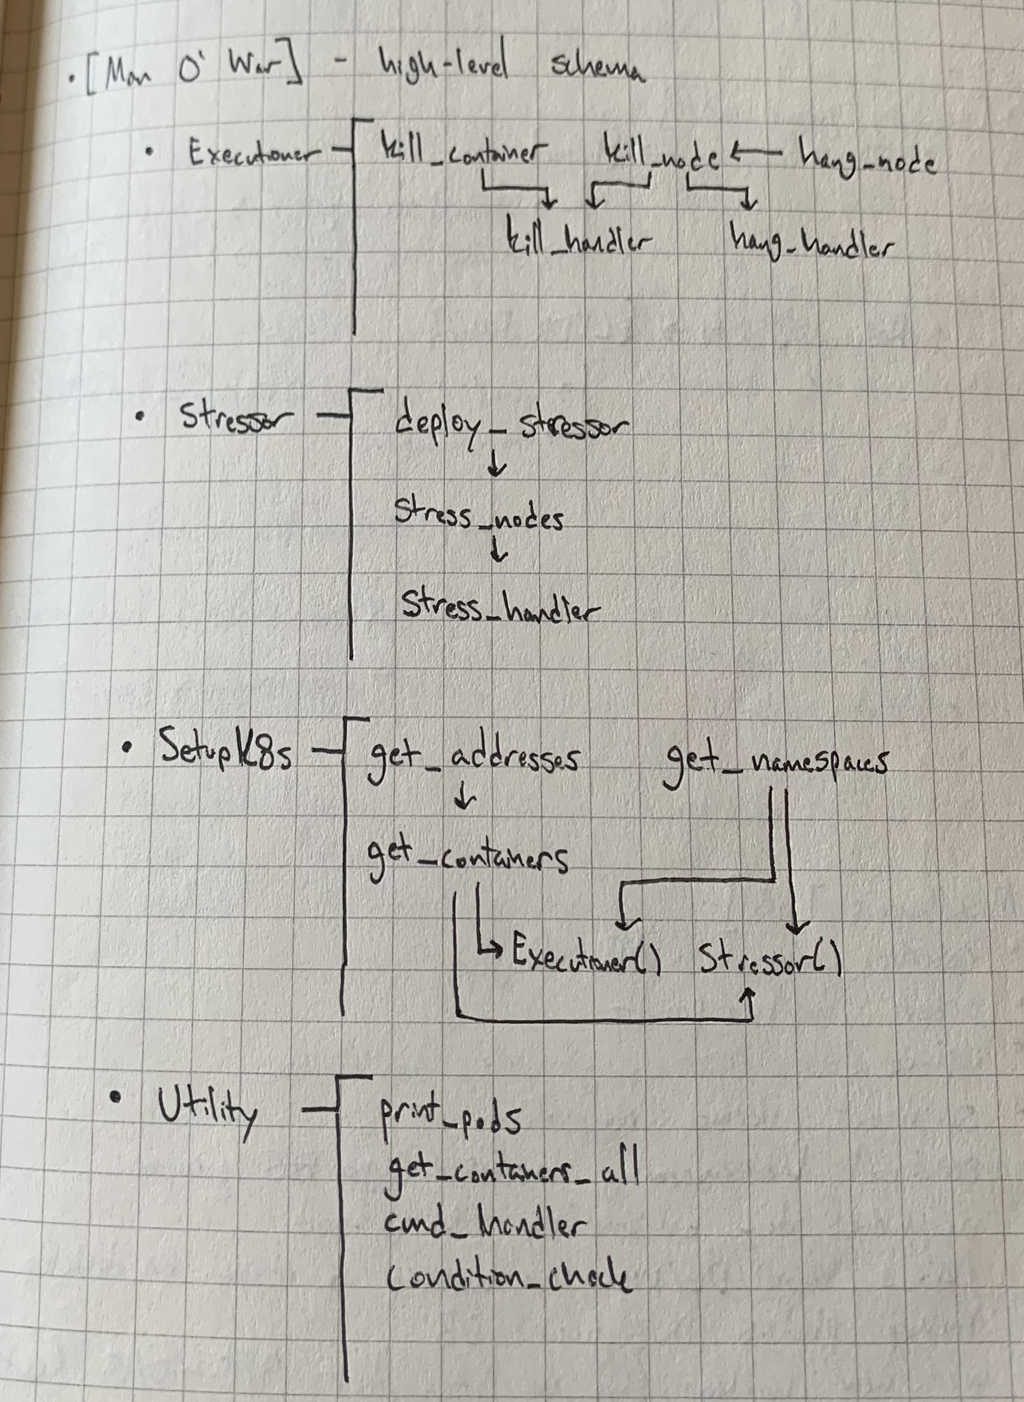
As this initial illustration shows, there are four main classes in the python file that contains all of the client library code. At a high level, they provide the following functionality:
- Executioner() contains the logic behind executing and logging kill signals to a container
- Stressor() contains the handlers to format shells via ‘docker exec’ to install and inject stress-ng commands, as well as deploying a Stressor Job via kubectl
- SetupK8s() contains functions to retrieve cluster configuration information so that objects of the above two classes can communicate to the desired nodes and containers
- Utility() contains any miscellaneous functions that provide additional formatting or condition checks
Below, this diagram shows the logical flow of the program when running default_stress() from the main.py file.

Differences in Bare-Metal and Local Testing
Initially, this project was aimed at a set of clusters bootstrapped on bare-metal servers. If you interact with Kubernetes, you understand that the specific configuration of a cluster varies greatly in the wild. Networking in particular poses an abundance of challenges when it comes to writing consistent tests for Kubernetes nodes. So, I decided to try out a newer tool for local development. Most people are familiar with Minikube, as it is referenced in the official documentation for Kubernetes, as well as a majority of the online tutorials that I’ve encountered. Kind has been gaining traction recently for its ease of use and relative light-weightiness. It is also a Cloud Native Computing Foundation (CNCF) certified Kubernetes installer.
Local Development with Kind
Kind, or “Kubernetes in Docker”, uses kubeadm to bootstrap a minimal control plane node (and optionally other worker nodes) entirely in a Docker container. This makes provisioning a “cluster” a simple one-line command and consumes a fairly light but configurable amount of resources. Compared to the boot time and complexity of a virtual machine, kind has a lot going for it. Unfortunately, one of those things is not documentation. Check out this post that I referenced when I first installed the package. If you’re on a Linux distribution, the following steps are roughly what you’ll need to get man-o-war working with a local cluster:
- These first two commands will depend on which flavor of Linux you run, check your package manager for information about go and docker, both are prerequisites to kind
sudo pacman -S go
sudo pacman -S docker- The following is copied directly from the quickstart guide
curl -Lo ./kind https://kind.sigs.k8s.io/dl/v0.8.1/kind-$(uname)-amd64
chmod +x ./kind
mv ./kind /usr/local/bin/kind- Depending on your setup, you may need to hook docker into your startup script (and if you want to run docker commands as a non-root user, reference the post-install steps for docker here)
systemctl start docker- Create a cluster with the default configuration via kind, and retrieve some information about the node
kind create cluster
kind get clusters &&
kubectl get nodes -o wide &&
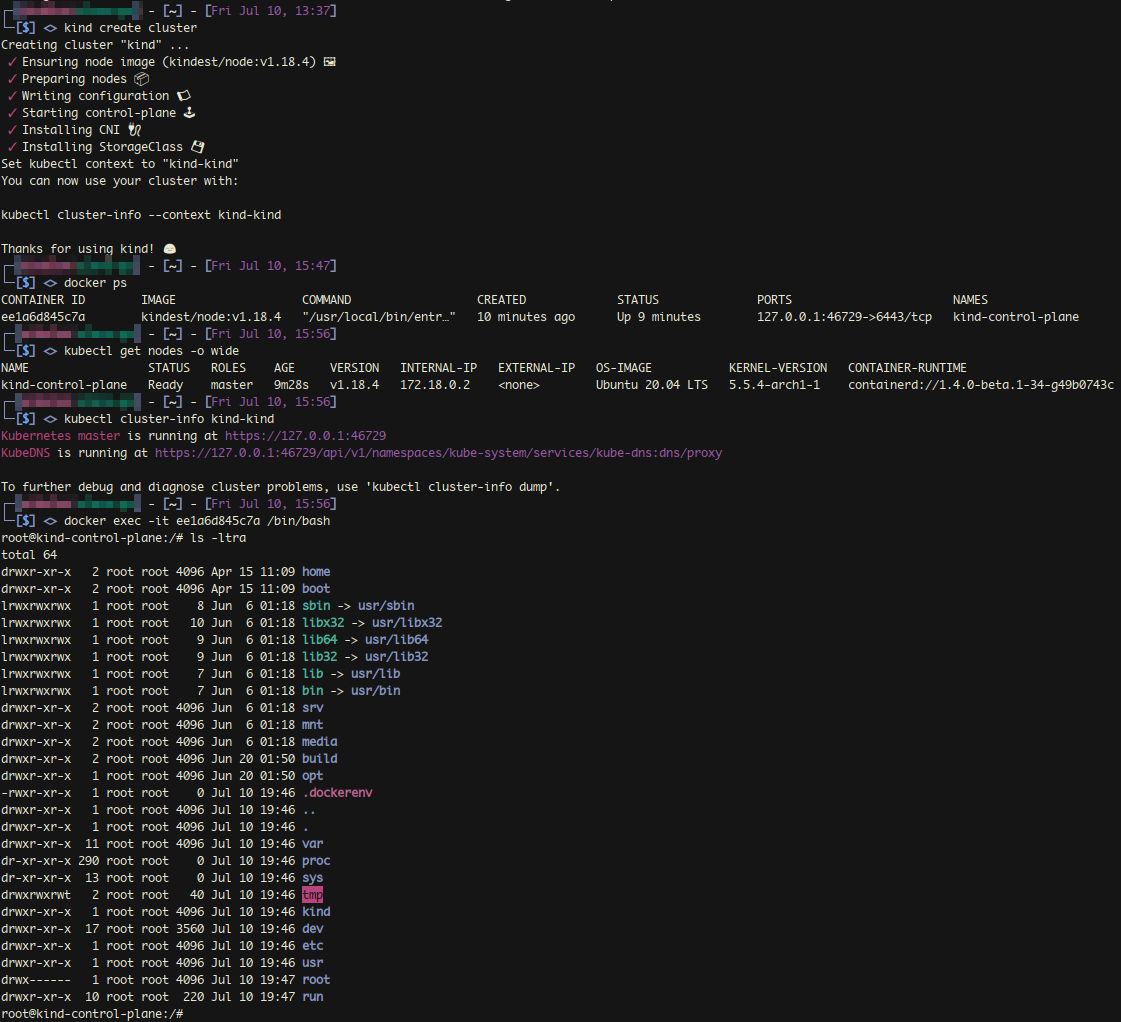
kubectl cluster-info --context kind-kindThe below image shows the terminal output of a cluster create operation and information gathered about the container. As you can see, everything expected is accessible via a local IP address, and ports can be exposed similarly to experiment with various CNI plugins.
Running Man-O-War with Kind
First, let’s use the SetupK8s() class to retrieve information about our node.
def print_all_containers():
    manowar = SetupK8s()
    hosts, setup = manowar.node_addresses()

    for node in setup:
        print(node)
        print("\n")
        print(manowar.get_containers(host_ip=node))

def main():
    print_all_containers()

if __name__ == '__main__':
    main()
python3 main.pyThe terminal output below shows the local internal IP address assigned to the docker container for the cluster, as expected.

Now, we can take a look at adding additional Pods, Jobs, and CronJobs to the cluster via kubectl. The following commands will use a static YAML template to deploy a one-time job to the cluster, and remove it after execution:
kubectl apply -f templates/predefined-cpu-stressor.yml
kubectl delete job cpu-stressor
The template specified above is simple but not particularly extensible:
apiVersion: batch/v1
kind: Job
metadata:
  name: cpu-stressor
spec:
  ttlSecondsAfterFinished: 60
  backoffLimit: 5
  activeDeadlineSeconds: 60
  template:
    spec:
      containers:
      - name: default-stressor-ctr
        image: alexeiled/stress-ng
        resources:
          limits:
            memory: "500Mi"
            cpu: "4"
          requests:
            memory: "250Mi"
            cpu: "1"
        args:
        - "--cpu"
        - "4"
        - "--timeout"
        - "45s"
      restartPolicy: OnFailure
It is also possible to pass dynamic arguments in the args field to create a template from the python code. Below is an example:
apiVersion: batch/v1
kind: Job
metadata:
name: default-stressor
namespace: stressor
spec:
ttlSecondsAfterFinished: 120
backoffLimit: 5
activeDeadlineSeconds: 60
template:
spec:
containers:
- name: default-stressor-ctr
image: alexeiled/stress-ng
resources:
limits:
memory: "1000Mi"
cpu: "4"
requests:
memory: "500Mi"
cpu: "2"
command: ["/stress-ng"]
args: {{STRESS_LOAD}}
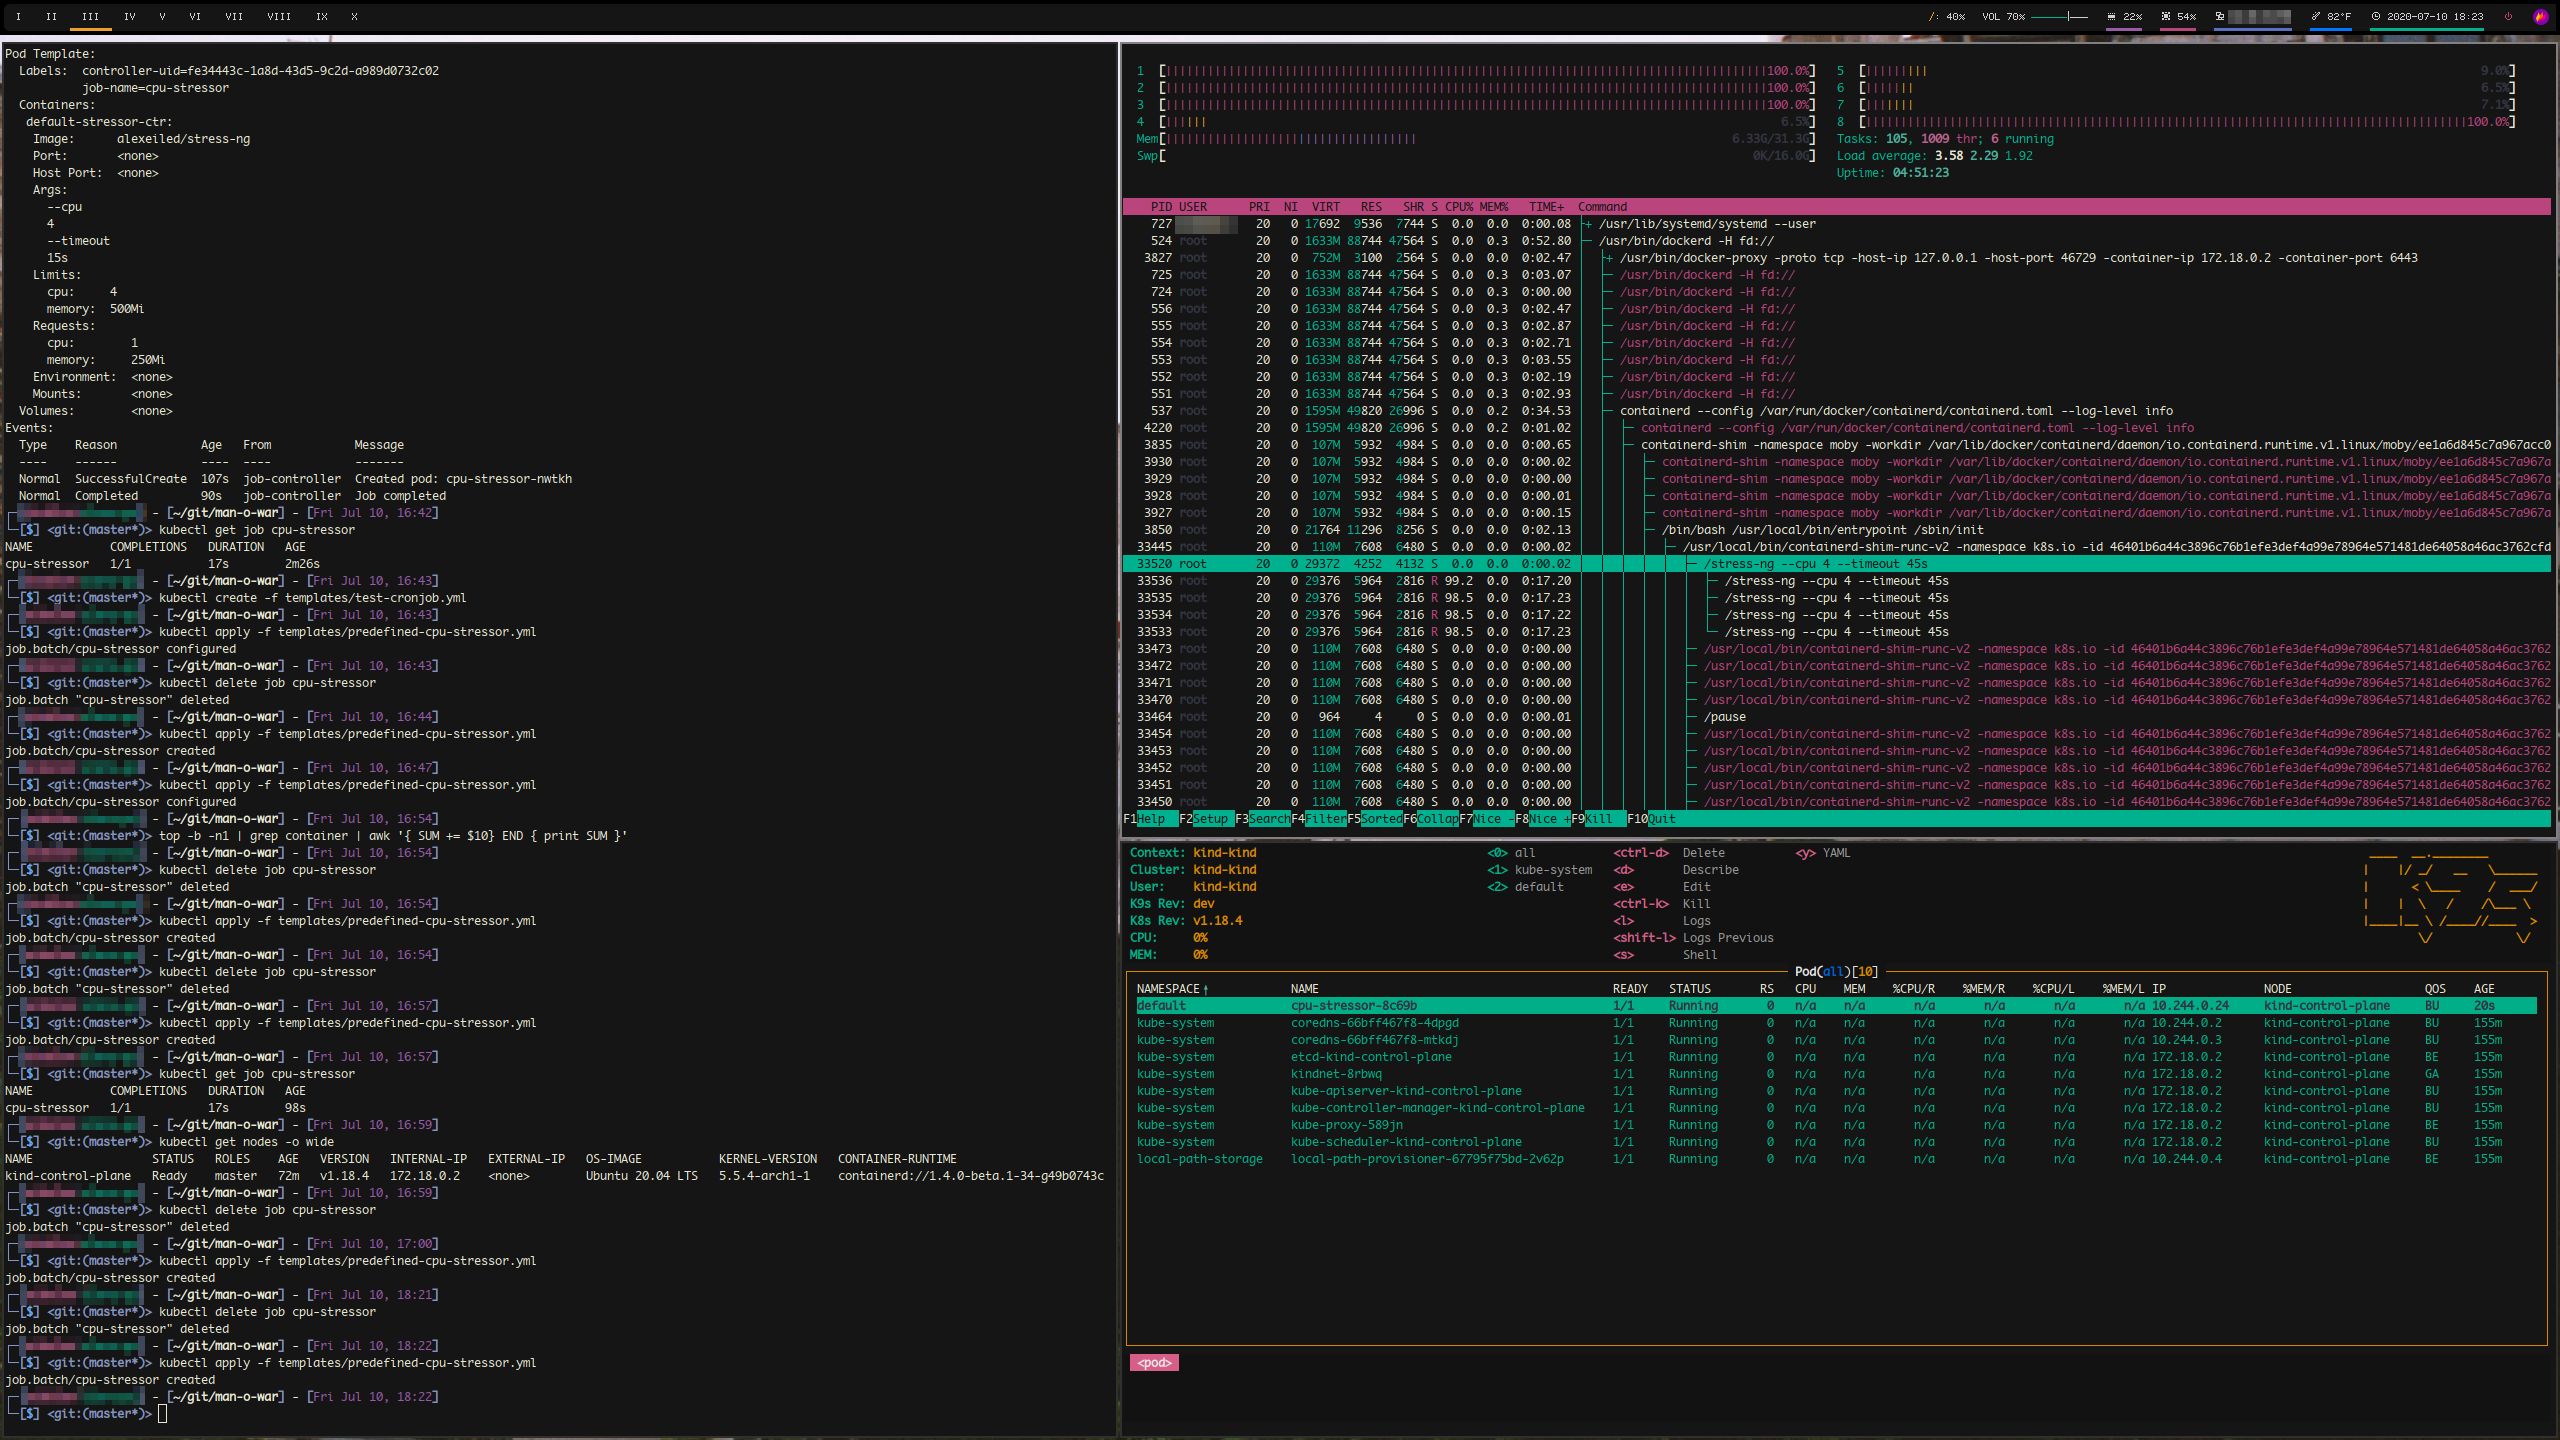
restartPolicy: NeverThe below screenshot shows man-o-war in action, after deploying one of the above Stressor Jobs.
- On the left side, a terminal window (termite/zsh) has printed node information and is where the Stressor Job is applied to the cluster.
- The bottom right window is k9s, an application to display Kubernetes information in the terminal, which shows the status and metadata of every kind cluster component. Highlighted is the cpu-stressor Job actively deployed.
- The top right window is htop, and highlighted is the parent process of the cpu-stressor Job. Here you can see the four sub-processes, one for each specified CPU core, which are all subsequently children of the docker container that represents the cluster. Towards the top of the window, you can also see that four (1, 2, 3, 8) out of eight CPU cores are at 100% utilization, which shows the stress-ng package is effective testing locally with kind.
Moving Forward
The ReadMe on GitHub describes the state of both completed and planned functions in pod_executioner(). Aside from expanding the variety of signals and stress playbooks sent to pods, the highest priority is to streamline any references to IP addresses and ports, as there is not currently 1:1 functionality between actual bare-metal clusters and kind clusters. Adding support for recognized CNI plugins is also on the shortlist of features to add.